the vegetable patch diaries

Friday, 5 July 2013

Rye Potatoes (Indian Potatoes)

This has to be one of my favourite Indian dishes - tasty potatoes coated in spices. I finally learnt how to make this and I never realised how simple and quick it is. 


The ingredients you'll need include: 
  • New potatoes
  • 1.5tbsp mustard seeds 
  • 1.5tbsp curry leaves
  • 1tsp heaped of cumin seeds
  • Bunch of fresh coriander 
  • 1/2tsp chilli powder
  • 1tbsp heaped of grounded coriander seeds (dhana)
  • 1/2tbsp cumin (geera)
  • 1tsp heaped turmeric (haldi)
  • 3/4tsp Salt
  • Lemon juice

 
Method:
1) Boil the potatoes on a medium heat until they are just cooked. Don't over cook these as you will need to fry these later on. 

 
2) While the potatoes are cooking you can prepare the spices. Measure all the spices and keep these ready. Chop the coriander finely. 


3) Once the potatoes have cooked leave them to dry - they must be completely drained of all water as you'll be adding this to oil later. After they have completely dried cut these into medium sized chunks.

 
4) Next using a non-stick pan add some cooking oil. Make sure this pan used has a lid - you'll need this. Put this on a high heat and wait until the oil is very hot. This will take approximately 1 minute to heat. 

 
5) Next grab the pan lid and the mustard seeds, curry leaves and cumin seeds. Throw these all into the pan and put the lid on immediately. It's really important you use the lid because the seeds will fly out of the pan. Allow them to cook on a high heat until they begin to sizzle. This will take about 10 seconds. Don't overcook these otherwise they will burn. The seeds must sizzle - if they don't then it means they aren't cooked. When they start sizzling reduce the heat to a mid-low heat. 

 
6) Remove the lid of the pan. This is no longer needed. Add in the dry potatoes and stir so the potatoes chunks catch the mustard seeds. Leave these to cook for a while until they go brown. Add more oil if required. 


7) Mix up the spices (the chilli powder, grounded coriander seeds, cumin and turmeric) and then sprinkle onto the potatoes. Stir in the spices until they coat the potatoes.


8) Cook the potatoes until they soften. Even though these have been boiled they still require  more cooking. Add more oil to make the potatoes crispy if required. 


9) At the very end add the fresh coriander and stir. Then add 1tbsp of lemon juice and stir in too. 


Then your potatoes are ready to eat!

Sunday, 30 June 2013

P-P-Perfect Picnic - Pesto Pasta & Potato Salad

It's been a while since I last blogged (Google decided it didn't like me anymore and blocked my account) but I'm back to share my simple picnic recipes. 

With this great weather we are having this weekend I visited a few parks and they were busy with "picnic-teers" so it got me thinking about picnic food. Two of my favourite picnic snacks are Pesto Pasta and Potato Salad, and they are so simple and easy to make. 

Pesto Pasta:
 
The ingredients needed for this include:
  • Pasta (any kind)
  • 2-3tbsp pesto sauce
  • Philadelphia cream cheese 
  • Garlic (optional)
  • Cheese (optional)


Method:
 
1) First we need to boil the pasta. Any kind can be used. Today I've used farfalle pasta. It's rough texture means it captures every drop of sauce and retains flavour. Whilst boiling this add a drop of olive oil. This prevents the pasta from sticking together (and sticking to the pan).
 
2) While the pasta is cooking you can make the sauce. Add the pesto to a pan and stir. To this add a little bit of water and the philadelphia cream cheese. Stir on a low heat until the Philadelphia has completely mixed in. At this point you can add garlic if you like. I usually just use garlic philadelphia cream cheese. 


3) Keep the sauce on a low heat continually stirring. Once the pasta has cooked add this to the sauce and mix it all in fully coating the pasta. 


4) To finish this off I grated some cheddar cheese and sprinkled with mixed red and black pepper. Yum!


Next is the Potato Salad:

The ingredients for this include:
  • 1 tin of new potatoes
  • 3tbsp mayonnaise  
  • Bunch of spring onions 
  • Bunch of chives
  • Garlic
  • Salt
  • Lemon juice (optional)
  • Black pepper


1) Boil the new potatoes for approx 10 minutes. Stir these from time to time ensuring these don't overcook (soft potatoes don't suit this salad).

 
2) While the potatoes cook, rinse the spring onions and chives under cold water. Chop these finely into small pieces - the smaller the better. Next crush the garlic. 


3) Once the potatoes are cooked drain the water and allow to cool. After a few minutes chop the potatoes into quarters - bite-sized chunks to your linking. Get a large bowl and put these in along with 3 heaped tablespoons of mayonnaise. Stir the mayonnaise thoroughly coating all of the potatoes, adding more mayonnaise as you go if required. Be careful, 3 heaped tablespoons tends to be more than enough. 


4) Next add salt - quite a lot of it (I never said this recipe was healthy!) Add the salt in gradually, a little bit at a time until you are happy with the saltiness. Make sure you stir the salt in thoroughly. An optional ingredient at this stage is lemon juice. This should be added of you want to turn your classic potato salad into one with a twist, a lemon twist. Only add a little swig of lemon juice. No more than this is needed.
 
5) Finally, to finish this off and add a bit of colour, add the chopped spring onions, chives and crushed garlic. Stir these all in together. Top this off with a sprinkling of black pepper. Then serve up!


I hope you've enjoyed my simple picnic recipes. They are quick and easy to make. Lets just hope the great weather continues so we can have more picnics (or to quote "Yogi Bear "picinics")!

Sunday, 24 February 2013

Home Made Quiche

Last week Dina taught me how to make quiche from scratch. This recipe is recommended if you're looking for some really wholesome good home made cooking.


Having a background of dietetics, Dina is one of the healthiest food-conscious people I know. So if Dina approves, you know it must be good for you.


First we need to accumulate the following ingredients:
· Vegetables (I've used a combination of aubergine, broccoli, spinach and tomatoes for my quiche filling. What you use is up to you.)
· 150g plain flour
· 75g butter (both salted and unsalted work)
 
· 5 large eggs
· 1tbsp vegetable oil
· 1tsp pepper and salt
· 1tsp vegetable stock
· 200g grated cheddar cheese
· 400ml milk


Method:

1) Before preparing the quiche base we pre-heated the oven.

2) We then began by mixing the flour and butter together until it formed a bread crumb texture. An egg was then used to bind the mixture together (water can be used as a substitute for egg).

3) Once resembling a pastry mixture, we rolled into a circular shape, approx 5mm thick and placed in the baking dish.

4) The quiche needs to be lightly baked first for approx 15/20 minutes at 170•C to prevent the base from going soggy once the quiche filling has been added. Before baking we pricked the pastry with a fork to prevent the mixture from puffing.


5) While the base was baking we created the quiche filling (stage 1). We cleaned and diced our selected vegetables - the aubergine, broccoli, spinach and tomatoes.


6) Next we fried in a pan using a little bit of vegetable oil. The aubergine and broccoli take the longest to cook so these were chopped into especially small pieces and fried in the pan first for longer cooking time. Afterwards the remaining vegetables were added.

A little tip, Dina added a pinch of vegetable stock to enhance the flavour of the quiche filling. 


7) Once cooked we left to cool down and moved onto the stage 2 of the quiche filling. Using 4 large eggs we cracked into a mixing jug, added a dash of pepper and salt. The eggs were then beaten.

8) Once the vegetables had cooled down they were then added to the eggs, along with 200g of grated cheese (we like our quiche cheesey but the amount of cheese can vary to your likings) and 400ml of milk. These were stirred together.

9) We then removed the quiche base from the oven and poured the mixture into the centre. If possible try and use all the mixture and fill to the top. Being the cheese lovers that we are we sprinkled grated cheese on top too and then baked in the oven for a further 45 minutes at 170•C.


10) Once cooked you should allow to cool down for 5 minutes (but Dina and I ignored that and dug straight in!) 


This takes a while to cook but tastes delicious. We served with a side of fresh spinach and sweet red pepper in a balsamic vinegar and olive oil dressing. Tasty!

I will definitely be cooking this again soon!


Sunday, 17 February 2013

Veeraswamy - London's Oldest Indian Restaurant (1926)

To celebrate Valentines, Freddo took me to a sophisticated restaurant for some high class dinning.


Located on Swallow St. in Mayfair, Veeraswamy is one of London's oldest Indian restaurants (1926).


We stepped into a small corridor beautifully decorated leading to a silver lift. Our coats were taken and we took the lift to the first floor of the building. As we stepped out of the lift doors, we were immediately welcomed by polite, friendly staff. The ambience was warm and intimate, with views of the very impressive Regents St. by night - a very romantic setting.


We were shown to our table, which was romantically dressed with red rose petals and a pretty window view of Swallow St. decorated in fairy lights.

We both ordered the lychee lemonade - this was sweet and fragrant. For starters we began with the vegetable bhajias. Unlike traditional bhajias, these were whole vegetable pieces cooked in a spiced batter and accompanied with tamarind and mint sauces. The selected vegetables included asparagus, broccoli (my personal favourite), courgette and spring onion. These were so delicious that it didn't take long to eat them!


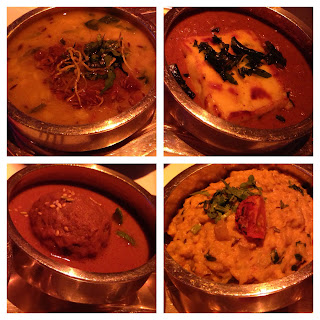
Next followed the main course. Freddo ordered Butter Paneer Lababdar. This is the Indian equivalent of cottage cheese in a creamy onion and tomato sauce. I ordered the Vegetarian Crescent Platter. The vegetarian platter consisted of 4 small bowls, each deceptively filling and satisfying.


Bowl 1 featured a traditional lentil curry, Daal. This is a stew of lentils cooked with tomatoes, spinach and a variety of spices including turmeric which gives it its bright yellow colour. The daal was light, not heavy like most and the tomatoes used were fresh.

Bowl 2 included a Kolhapuri Kofta. The Kofta consisted of blended vegetables cooked in spices, moulded into a ball shape and then served in a sweet, caramelised onion sauce.

The spiciest dish of the 4 mini meals was bowl 3, Bharta. Of all 4 bowls, this was my favourite and contained roasted mashed aubergine in a spiced garlic and onion sauce.

And bowl 4 featured Butter Paneer Lababdar - the same as Freddo's meal. The panner was soft and delectable, and perfectly suited the creamy onion and tomato sauce.


The experience, atmosphere, delicious food and friendly service made this a very special Valentine's celebration (thank you Freddo :) ). I highly recommend Veeraswamy for any special occasion.


Tuesday, 12 February 2013

Maru Bhajia (Crispy Potato Bhajia)

Have you heard of the tasty potato snack? It's a crispy potato chip coated in a spiced batter.

Freddo first introduced me to Maru Bhajias
last year when he took me to Maru's Bhajia House on Ealing Road, Wembley. Freddo has been going there since he was a little youngster and loves the place for its famous crispy Maru Bhajias. I recall when we went he ordered two servings of Maru Bhajias, ate it all and wouldn't let anyone borrow the accompanying sauce!


Eager to give it a go, I attempted to cook his favourite snack...Maru Bhajias - homemade style. To try this yourself you are going to need the following.

Ingredients for 2 servings:
·         5-6 medium white potatoes
·         1 cup chick pea flour
·         ½ teaspoon salt
·         ½ teaspoon chilli powder (optional)
·         1 teaspoon ajwain  (carom seeds)
·         1 teaspoon coarsely ground pepper
·         Pinch of turmeric
·         Pinch of soda bicarbonate
·         Very small bunch of finely chopped coriander
·         1 teaspoon of mixture of green chillies and ginger (optional)

 
Method:

1) Peel and slice the potatoes (thin slices are best).

2) Wash and soak the potato slices in salted water for 15 minutes.

3) Mix the salt, pepper, chilli powder, ajwain and turmeric with the chick pea flour.

The recipe calls for layering the potatoes and then coating with the mixture (instructions below). Instead, I mixed everything it in a bowl and this seemed to work - do this if you're time short.

4) Sprinkle this mixture thinly on a tray. Sprinkle some coriander, chillies and ginger mixture thinly on the chick pea flour.

5) Drain the potatoes and layer them on top of the chick pea flour and spices.


6) Sprinkle the chick pea flour mixture on top of the potato slices topped by the coriander, chilli and ginger.


7) Repeat this until all the potatoes have been layered up. Leave this for 30 minutes.

8) Add the bicarbonate soda to the mixture. Using hands, mix the potatoes well until they all get thinly covered with the flour and spices mixture (now its tempting to add water - don't). The salt washed potatoes will create moisture to enable you to cover all the potatoes with the chick pea flour.

9) Heat some oil in a wok and fry the potatoes. Keep the heat high for the oil.

Here's a tip: add a few drops of the potato mixture – if it rises quickly to the top, your oil is ready.

10) Lower the heat and fry the bhajias at medium heat to allow them to cook well and crispy. Adjust the heat if necessary.
Now it's no secret that this snack is very unhealthy for you...but you only live once!


For the Bhajia sauce, grab these ingredients:
· 3 fresh ripe tomatoes
· 1 carrot 
· 1 green chilli
· Pinch of salt

Method:

1) 
Cut the ripe tomatoes, carrot and green chilli into small pieces.

2) 
Blend. 

3)
Add a little bit of water for the carrots to blend properly (it should resemble a gravy consistency).

4) 
Add salt.


Special credit needs to go to Freddo as the outcome above was a result of our combined effort. Freddo rates the original 10/10. Our attempt got rated 7/10. Scoring 7 from the expert on Maru Bhajias is a success! Give it a go and let me know how you rate your very own Maru Bhajias.

Monday, 4 February 2013

Tasty Stir Fry

I'm not an amazing chef in the kitchen so when I find a meal that is quick and easy to cook, and also tastes as good as it looks I'm a happy cook. I love noodles that hold flavour - my favourite sauce is plum sauce. This really sticks to the noodles and retains great flavour. Today though, I've used something different.


So here are the simple steps to creating tasty noodles in less than 10 minutes:

1) Grab some greens and chop them up - I've used carrots, tatsoi leaves, butternut squash, spring onions, lemongrass and ginger.

2) Next using a little bit of olive oil fry these in a wok for 2 minutes gently stirring.

3) I've bought pre-cooked noodles (there is no shame in "cooking" food which is ready made - trust me it's not cheating). These go in the wok too. Stir these up with the vegetables for a further 2 minutes. By now the vegetables should have reduced and appear softer.

4) Add sauce. You can find some great sauces in jars off the supermarket shelf. My favourite is plum sauce - it's sweet and aromatic. Today though I have used sweet soy garlic and ginger sauce. The ginger gives a traditional oriental kick to the noodles.

5) Finally, dish up and chow down.


I've adding a side of plain steamed rice and soy dipping sauce. And there you have it - quick, delicious stir fry noodles made easy every time.

Saturday, 26 January 2013

Afternoon tea

I jumped at the chance to buy a deal I saw online for Afternoon Tea at the Hilton Park Lane, London. Fancy tea, pretty cakes and posh finger sandwiches! I purchased the deal and invited my friend. We have a lot in common - she has the same name as me (natasha) and is vegetarian too.

Upon arriving we were welcomed into the Podium restaurant where we were to have our Afternoon Tea. But this was no ordinary tea party, this was the 'confessions of a chocoholic' afternoon tea. Equation = a lot of chocolate, sweet treats and delicious cakes.


We began our tea party by selecting some tea from their diverse menu. Natasha went for the 'jasmine flower maidens' tea (top left) - a sculptured hand rolled jasmine tea that blossoms over hot water. I went for the 'silver needles' tea (bottom right) - the rarest of the rare teas. Both much needed after braving the winter cold walking from the station to the restaurant.


Shortly after, our finger sandwiches came. Now these tasted as good as they looked. We had (from left to right) asparagus and lettuce with balsamic vinegar and a sprinkling of cheese. New to asparagus this was actually really nice. Next was tomato and mozzarella with a pesto drizzle. As a rule of thumb, anything that has mozzarella or pesto is a winner for me. After that, traditional cucumber and cream cheese topped with chives - this is always a favourite. Next was good old cheddar cheese with a hint of grape. These went really well together and are worth trying. Finally we had egg and cress. I didn't like that one - there was too much of it on one little finger sandwich.


Next arrived the chocoholic cakes and treats. I won't go into detail about these but by the end of our afternoon tea session I was in a sugar coma, and not looking forward to the sugar crash - but it was definitely worth it. The picture above shows three levels of sugar overdose, and the tray on the top level was edible chocolate!

I paid £29.50 for two people (after the 50% deal discount). If you want to treat a friend or taste a bit of the posh London scene (or just have a big sweet tooth) then this is definitely something I would recommend.

I am now inspired to host my very own afternoon tea with home made finger sandwiches and cakes. Watch this space!